Wednesday, July 29, 2015

SSH Connect Script without prompting for password and automatically sudo su

#!/usr/bin/expect -f
spawn ssh user@hostname
expect "assword:"
send "mypassword"
send "sudo su -\r"
interact

Rename filename Linux

mv filename_old filename_new

Add read, write and execute permissions for the owner user in Linux

chmod 700 file.sh

Wednesday, June 3, 2015

Upload files to Amazon EC2 Linux instance

scp -i myAmazonKey.pem file.zip ec2-user@mec2-50-17-16-67.compute-1.amazonaws.com:~/.

Saturday, April 4, 2015

Useful Linux/Unix commands

List files from current folder:
ls -l

Get current shell:
echo $SHELL

Get present working directory:
pwd

Get content from Home directory:
ls ~

List files from current directory:
ls .

Navigate to home directory:
cd

Navigate to root folder:
cd /

Find out file type:
file [path]

Navigate to a "two words" folder:
cd word1\ word2
cd 'word1 word2'

Hidden file name example:
.hiddenfile

List all files(including hidden):
ls -a

Manual page for a certain command:
man <command>
man -k <search term>

Chain parameters example for listing all files and add kilo, bytes to size:
ls -alh

Create a new directory:
mkdir learning

Create a new directory with parameter to display the action and parameter to create all directories if needed:
mkdir -pv dir1/dir2

Remove empty directory:
rmdir dir

Create new empty file:
touch filename

Copy a directory (including subfolders and files) to a new one:
cp -r dir1 dir2

Copy a file:
cp filesrc filedest

Move a directory (including subfolders and files) to a new one:
mv dir1 dir2

Rename file and directory:
mv filedir filedirnew

Remove a file:
rm filename

Remove non-empty folder:
rm -r folder

Interactive remove a folder or file:
rm -i file

Edit file with vi:
vi filename

Enter insert mode vi:
i

Enter edit mode from insert mode vi:
ESC

Save and exit from vi:
ZZ
:wq

Save vi changes, but don't exit:
:w

Discard changes and exit:
:q!

View file using different command than vi:
cat filename

View large files:
less filename
Note: b - previous page; Space - next page; q - quit;

Add numbers to vi lines editing:
:set nu

Navigating file in vi, edit mode:
Arrow keys - move the cursor around
j, k, h, l - move the cursor down, up, left and right (similar to the arrow keys)
^ - move cursor to beginning of current line
$ - move cursor to end of the current line
nG - move to the nth line (eg 5G moves to 5th line)
G - move to the last line
w - move to the beginning of the next word
nw - move forward n word (eg 2w moves two words forwards)
b - move to the beginning of the previous word
nb - move back n word
{ - move backward one paragraph
} - move forward one paragraph

Delete commands in vi, edit mode:

x - delete a single character
nx - delete n characters (eg 5x deletes five characters)
dd - delete the current line
dn - d followed by a movement command. Delete to where the movement command would have taken you. (eg d5w means delete 5 words)

Undo changes in vi, edit mode:

u

Copy/Cut-Paste vi:

Position the cursor where you want to begin cutting.
Press v to select characters (or uppercase V to select whole lines).
Move the cursor to the end of what you want to cut.
Press d to cut (or y to copy).
Move to where you would like to paste.
Press P to paste before the cursor, or p to paste after.

Wildcards:
* - Zero character or many of characters
? - Just one character
[] - Range of characters


Add data to Infragistics Grid using DataTable in C#

using System.Data;
using Infragistics.Win;
using Infragistics.Win.UltraWinGrid;

.....................

DataTable table = new DataTable("Table");

//Create three columns that will hold sample data.
DataColumn column1 = new DataColumn("CCY", typeof(string));
DataColumn column2 = new DataColumn("Percentage", typeof(int));
            

//Add the three columns to the table.
table.Columns.AddRange(new DataColumn[] { column1, column2});
table.Rows.Add("EUR",20);
table.Rows.Add("DKK", 120);

//Add the table to the dataset.
//this.dataSet1.Tables.Add(table);
manualSpreadsheetControl1.DataSource = table;
............

Sunday, February 22, 2015

Perl on Amazon Ec2 Linux AMI: Can't locate Class.pm in @INC when using Path::Class

This error is fixed by using the following command:

sudo perl -MCPAN -e 'install Path::Class'

Install GCC on the Amazon Linux AMI instance

1. Connect to your instance using the following command (I'm using MAC OS Terminal):
sudo ssh -i Key.pem ec2-user@Public_IP

2. Launch the following command to install GCC:
sudo yum install gcc

3. Verify gcc is installed:
gcc --version

Saturday, February 21, 2015

Simple XSLT Example


1. Following XML is received as input

<?xml version="1.0" encoding="UTF-8"?>
<Teams>
<team>
<title>Real Madrid</title>
<country>Spain</country>
</team>
<team>
<title>Arsenal Londra</title>
<country>England</country>
</team>
</Teams>


2. Following code is transforming the above XML into HTML format:

<?xml version="1.0" encoding="UTF-8"?>
<xsl:stylesheet version="1.0" xmlns:xsl="http://www.w3.org/1999/XSL/Transform">

<xsl:template match="/">
  <html>
  <body>
  <h2 style="font-family:arial">European Football Teams</h2>
    <table border="0" style="font-family:arial">
      <tr bgcolor="#9a0000" style="color:#fff">
        <th style="text-align:left">Name</th>
        <th style="text-align:left">Country</th>
      </tr>
      <xsl:for-each select="Teams/team">
      <tr>
        <td><xsl:value-of select="title"/></td>
        <td><xsl:value-of select="country"/></td>
      </tr>
      </xsl:for-each>
    </table>
  </body>
  </html>
</xsl:template>
</xsl:stylesheet>


3. And the HTML output:

More information when creating a new SSTP VPN connection to an Amazon AWS Windows Server


After creating a new SSTP connection and installing the certificate there are some additional steps that can be followed.

Those are in order not to route all Internet Traffic through the Amazon AWS Windows VPN and NAT server.

Here are the steps:

1. Right click the VPN connection adaptor -> Go to Properties and under Advanced config make sure "Use default gateway on remote network" is unchecked.

2. Connect to the VPN Server

3. As connection is succesful, there are no active routes to the private network instances. In order for this to be possible, following command needs to be run as administrator:
route add 10.0.1.10 mask 255.255.255 172.19.3.0

where:
10.0.1.10 - Private IP of the instance to be accessed via RDP
172.19.3.0 - VPN IP for the VPN and NAT Windows Server

4. You should now be able to RDP into the private instance.

5. The newly added routes should be automatically removed on VPN disconnect. If not, they can be automatically removed using:
route delete 10.0.1.10

Thursday, January 29, 2015

Command Line connect to Oracle DB and create a new stored PL/SQL procedure


1. Connect to Oracle DB using the following command:

sqlplus username@connectidentifier

2. Create a new TEST procedure using the following code:

CREATE OR REPLACE PROCEDURE PROC AS
BEGIN
DBMS_OUTPUT.PUT_LINE('TEST');
END;
/

3. Run the procedure using the following command:

exec TEST();

NOTE: If there is no output, run the "SET SERVEROUTPUT ON" command

4. You can test if the procedure was added by querying the ALL_OBJECTS table:

select * from ALL_OBJECTS where OBJECT_TYPE IN ('PROCEDURE')

5. Remove the procedure using the following command:

drop PROCEDURE USER.TEST

Sunday, January 11, 2015

Amazon AWS Cloud: Private Network behind Windows 2012 Server with SSTP VPN and NAT

At the end of this tutorial, the following network topology is created:


Steps:

1. A public and a private subnet need to already be defined on the Amazon Cloud.
Both are members of the following VPC: 10.0.0.0/16
Public subnet: 10.0.0.0/24
Private subnet: 10.0.1.0/24

Route tables contains the following rules:
Public subnet:
Destination - Target
10.0.0.0/16 - local
0.0.0.0/0 - igw-xxxxx (Internet Gateway)
172.19.3.0/24 eni-xxxxx / i-xxxxx (Eth1 Network Interface of the VPN NAT Server - 10.0.0.50)

Private subnet:
Destination - Target
10.0.0.0/16 - local
0.0.0.0/0 - eni-xxxxx / i-xxxxx (Eth2 Network Interface of the VPN NAT Server - 10.0.0.52)
172.19.3.0/24 - eni-xxxxx / i-xxxxx (Eth1 Network Interface of the VPN NAT Server - 10.0.0.50)


2. Launch a new Windows Server 2012 instance on the public subnet and assign 10.0.0.50 private IP. 
An Elastic IP needs to also be assigned to the new instance. An additional network interface will be  added to it in order to communicate with the private subnet. Private IP for this second network interface is 10.0.0.52.

Following security rules need to be enforced:
Type - Protocol - Port Range - Source
RDP - TCP - 3389 - x.x.x.x/32 (Public IP of the Server Administrator)
HTTP - TCP - 80 - 10.0.1.10/32 (Used by the NAT server to allow Internet access for the private instances)
HTTPS - TCP - 443 - 0.0.0.0/0 (Used to connect via SSTP VPN)

3. Additionally launch a new Windows instance on the private network for testing. Assign it a private IP (e.g. 10.0.1.10) and enforce following security rules:

Type - Protocol - Port Range - Source
RDP - TCP - 3389 - 0.0.0.0/0 (Enforce this even further if only certain IPs need to access via RDP)
All ICMP - All - N/A - 0.0.0.0/0 (Enable ping on this instance)

4. Connect to the public server (Windows 2012 SSTP VPN NAT Server) and check and Install updates.

5. Add new user and Allow Dial-in (Run->lusrmgr.msc)

6. Launch Server Manager and add Active Directory Domain Services Role. Add DNS Server as well(ignore warnings) and Promote server to a new domain forest.

A good step-by-step guide on this step is here:
http://social.technet.microsoft.com/wiki/contents/articles/12370.windows-server-2012-set-up-your-first-domain-controller-step-by-step.aspx

7. Configure Certificates and SSTP VPN and NAT server.

Add Active Director Certificate Services Role. Launch Run->mmc, add Certificate Authority to the console (Ctrl+M) and create a new Certificate Template (Copy after IPSec).

Change the Template Display Name to "SSTP-VPN" under the General Tab.
Under Request Handling select "Allow private key to be exported".
Under Extensions Tab, Edit Application Policies and Add Server Authentication. 

Issue the new certificate from Certificate Templates->Right Click->New->Certificate Template to Issue. Before checking SSTP-VPN Template, click More Information is required to enroll for this certificate link. Select Type as Common Name and add the Elastic IP as the Value (e.g. 54.122.23.45). Click Add.

Add Certificates(Local Computer) to the mmc Console (Ctrl+M). Under Personal Request new certificate.

Useful video on adding certificates is here:
https://www.youtube.com/watch?v=inRfk0r7Pgo

8. Next step is to add Remote Access role from Server Manager.
Launch Routing and Remote Access Manager (Run->rrasmgmt.msc) and Configure the server. Choose custom customization and select VPN and NAT.


9. Configure SSTP and NAT Server
Under Properties-> Security Tab click Authentication Methods and make sure only Microsoft encrypted authentication version 2 (MS-CHAP v2) is selected.

Under SSL Certificate Binding section select the newly added certificate (Elastic IP name).

Under IPv4 tab select Static address poll and add as many addresses starting from 172.19.3.0
Select the Adapter that has the 10.0.0.50 static IP (the one used to connect to Internet).

Check the Static Routes(Right Click-> Show IP Routing Table..) and make sure the following two are added:
10.0.0.0 255.255.255.0 10.0.0.1
0.0.0.0 255.255.255.0 10.0.0.1

Configure the NAT Server  by adding all network interfaces (Internal, Ethernet and Ethernet 2). Ethernet is the Public Interface connected to the internet and has Enable NAT on this interface checked.

A good documentation with steps on configuring NAT is here:
http://followkman.com/?p=1251

10. In order to test on a client Windows Computer there is the need to first download the certificate from https://ElasticIP/certsrv

Login using Server User Credentials and Download the certificate from the above url.
Install the certificate from Run->mmc->Import Certificate. It needs to be added under Trusted Root Certification Authorities.

Under registry (Run->regedit) following registry key need to be set up:
Registry subkey:
HKEY_LOCAL_MACHINE\System\CurrentControlSet\Services\Sstpsvc\Parameters
Registry entry: NoCertRevocationCheck
Data type: REG_DWORD
Value: 1


After installing the certificate new VPN SSTP connection needs to be created.

It should successfully connect to the AWS VPN. Going further, it should work to connect to the private instance and Internet is enabled on this instance (NAT).

Sunday, January 4, 2015

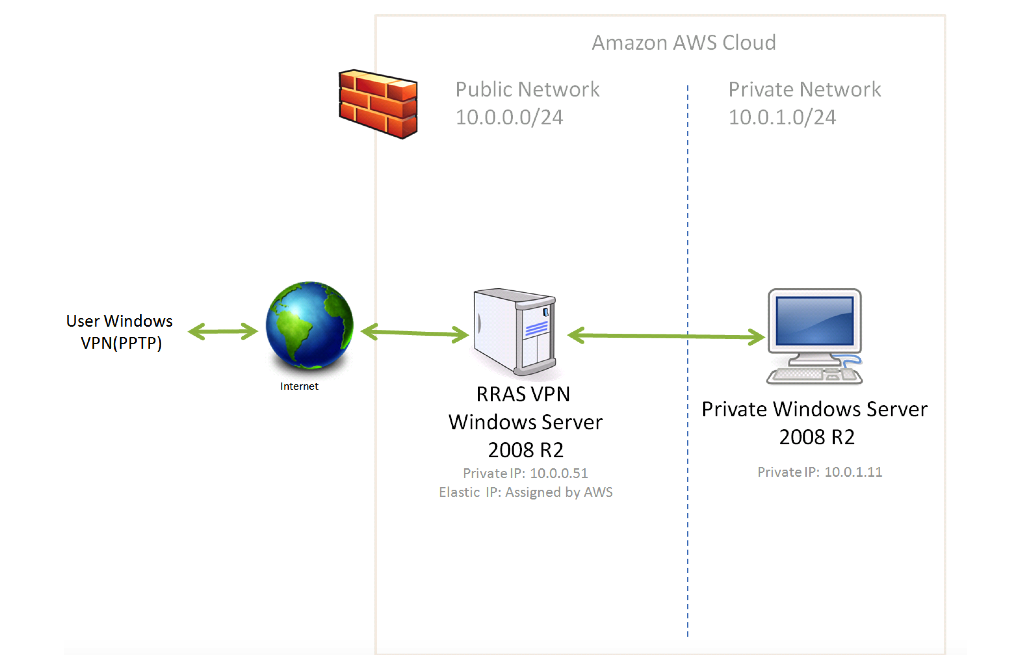
Create an Amazon AWS EC2 private network accessed via PPTP VPN

At the end of this tutorial, the following network topology will be implemented:


Reference Links:

Here is a great resource from where useful things can be learned on how to setup VPN on AWS:
http://community.spiceworks.com/topic/540710-individual-vpn-connection-to-an-aws-vpc


Steps:

1. Create VPC with two subnets

Create a new VPC from under EC2 VPC Dashboard->Your VPCs. The new VPC CIDR is 10.0.0.0/16:


From under Subnets, create a new subnet with the CIDR 10.0.0.0/24. This will be the public network from our topology:


Configure the following Route Table for the Public subnet:


Create private subnet with the 10.0.1.0/24 CIDR:


Configure the following route table for the private subnet:


2. Add Windows image to the private subnet

From AWS EC2 console Launch a new Windows Server 2008 R2 base instance. Follow all the steps to assign storage, make it part of the private subnet and make sure it has a static IP assigned (10.0.1.11).


As for security, make sure RDP is reachable. I also enabled ICMP in order to ping the instance. There is no need to worry now about letting those ports accessible from anywhere (0.0.0.0/0) as the instance is part of a private network and cannot be accessed via internet.


3. Add Windows Server 2008 image to the public subnet


The same steps as the ones from step 3 need to be followed with the following differences:


Instance is part of the public network(10.0.0.0/24) and has the 10.0.0.51 static IP assigned. As for security, following configuration is used:


RDP is only accessible to system administrators and Port 1723 and GRE Protocol are used by VPN communication. ICMP is used to ping the instance.


4. Assign Elastic IP to the Public Windows Server 2008 R2 instance


Change the “Source/Destination Check” flag to “Disabled”. You can do this from the AWS “Instances” list. Select the newly added public Windows Server 2008 R2 instance and select this option.


In order for the VPN server to be accessible via Internet an Elastic IP needs to be allocated and associated with the public Windows Server 2008 R2.


5. Configure RRAS VPN Server


Get public Windows Server 2008 R2 instance password and use the assigned Elastic IP to connect using Remote Desktop.


Before doing any setup, apply any pending windows updates.


Create a new user to be used for VPN connection. There is a minimum password complexity option that need to be taken into consideration. It can be changed from under Run->secpol.msc


Allow Dial-Up access for this user from under Properties->Dial-Up sub tab:


Under Server Manager add the Network Policy and Access Services Role. Just accept the defaults and click next. Remote Access Services and Routing need to be selected at the Role Service step.


Once the installation is complete, click Close.


Expand the new installed role from under Server Manager, right click Routing and Remote Access and launch Configure and Enable Routing and Remote Access. Select Custom Configuration and click Next.

Select VPN Access and NAT checkboxes and complete the installation.

Next step is to allow access through firewall. Open firewall settings and make sure Remote Access is enabled (all three checkboxes are selected):


Under Server Manager->Roles->Routing and Remote Access->Right click->Properties-> Security-> Authentication Methods-> Make sure only Microsoft encrypted authentication version 2 (MS-CHAP v2) is selected:


Under IPv4 subtab assign static IP for the users connecting to VPN:


For this example I used IP range from 172.19.3.100 to 172.19.3.120. Click OK and  then Apply.


Under IPv4->Static Routes add the following two routes:


Under IPv4->NAT add the following network interface:


Make sure Public interface connected to the Internet and Enable NAT on this interface are checked.


6. Configure routes at VPC level


As there are two subnets, there is the need to add a route to each route table to tell the VPC how to get packets to the VPN client.


This is done by adding the 172.19.3.0/24 RRAS_Server_Instance to the route table of both subnets.


Public subnet:


Private Subnet:


7. Test connection


On the machine which connects to the VPN create a new PPTP VPN connection and use the Elastic Public IP of the RRAS AWS Windows Server 2008 R2 and the newly configured user that has Dial-In Allowed.


After successful connection, RDP or ping to the private instance works.