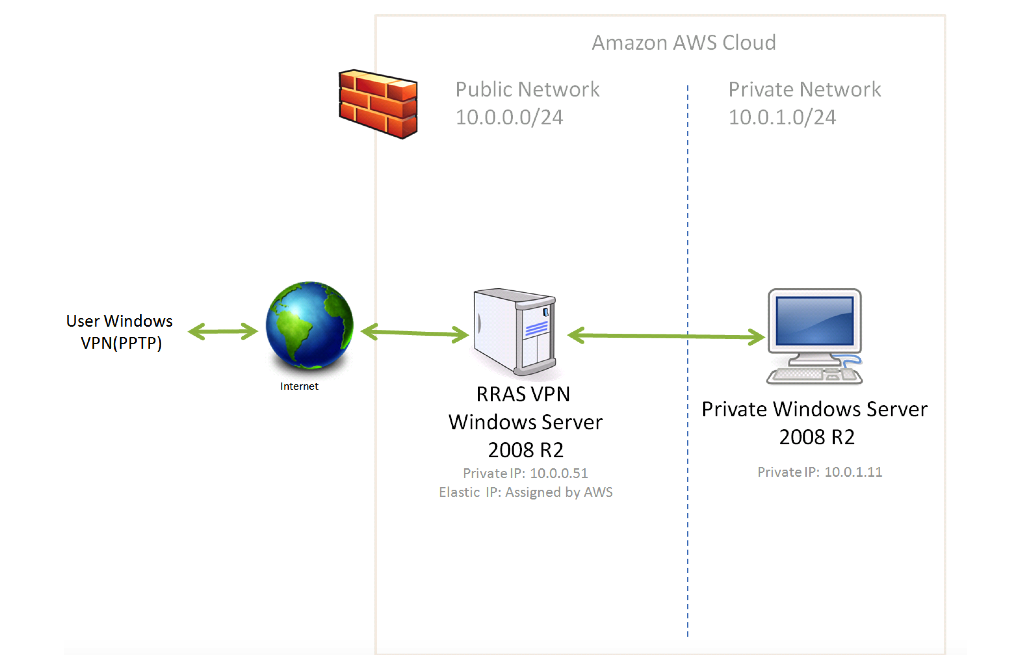
Reference Links:
Here is a great resource from where useful things can be learned on how to setup VPN on AWS:
http://community.spiceworks.com/topic/540710-individual-vpn-connection-to-an-aws-vpc
Steps:
1. Create VPC with two subnets
Create a new VPC from under EC2 VPC Dashboard->Your VPCs. The new VPC CIDR is 10.0.0.0/16:
From under Subnets, create a new subnet with the CIDR 10.0.0.0/24. This will be the public network from our topology:
Configure the following Route Table for the Public subnet:
Create private subnet with the 10.0.1.0/24 CIDR:
Configure the following route table for the private subnet:
2. Add Windows image to the private subnet
From AWS EC2 console Launch a new Windows Server 2008 R2 base instance. Follow all the steps to assign storage, make it part of the private subnet and make sure it has a static IP assigned (10.0.1.11).
As for security, make sure RDP is reachable. I also enabled ICMP in order to ping the instance. There is no need to worry now about letting those ports accessible from anywhere (0.0.0.0/0) as the instance is part of a private network and cannot be accessed via internet.
3. Add Windows Server 2008 image to the public subnet
The same steps as the ones from step 3 need to be followed with the following differences:
Instance is part of the public network(10.0.0.0/24) and has the 10.0.0.51 static IP assigned. As for security, following configuration is used:
RDP is only accessible to system administrators and Port 1723 and GRE Protocol are used by VPN communication. ICMP is used to ping the instance.
4. Assign Elastic IP to the Public Windows Server 2008 R2 instance
Change the “Source/Destination Check” flag to “Disabled”. You can do this from the AWS “Instances” list. Select the newly added public Windows Server 2008 R2 instance and select this option.
In order for the VPN server to be accessible via Internet an Elastic IP needs to be allocated and associated with the public Windows Server 2008 R2.
5. Configure RRAS VPN Server
Get public Windows Server 2008 R2 instance password and use the assigned Elastic IP to connect using Remote Desktop.
Before doing any setup, apply any pending windows updates.
Create a new user to be used for VPN connection. There is a minimum password complexity option that need to be taken into consideration. It can be changed from under Run->secpol.msc
Allow Dial-Up access for this user from under Properties->Dial-Up sub tab:
Under Server Manager add the Network Policy and Access Services Role. Just accept the defaults and click next. Remote Access Services and Routing need to be selected at the Role Service step.
Once the installation is complete, click Close.
Expand the new installed role from under Server Manager, right click Routing and Remote Access and launch Configure and Enable Routing and Remote Access. Select Custom Configuration and click Next.
Select VPN Access and NAT checkboxes and complete the installation.
Next step is to allow access through firewall. Open firewall settings and make sure Remote Access is enabled (all three checkboxes are selected):
Under Server Manager->Roles->Routing and Remote Access->Right click->Properties-> Security-> Authentication Methods-> Make sure only Microsoft encrypted authentication version 2 (MS-CHAP v2) is selected:
Under IPv4 subtab assign static IP for the users connecting to VPN:
For this example I used IP range from 172.19.3.100 to 172.19.3.120. Click OK and then Apply.
Under IPv4->Static Routes add the following two routes:
Under IPv4->NAT add the following network interface:
Make sure Public interface connected to the Internet and Enable NAT on this interface are checked.
6. Configure routes at VPC level
As there are two subnets, there is the need to add a route to each route table to tell the VPC how to get packets to the VPN client.
This is done by adding the 172.19.3.0/24 RRAS_Server_Instance to the route table of both subnets.
Public subnet:
Private Subnet:
7. Test connection
On the machine which connects to the VPN create a new PPTP VPN connection and use the Elastic Public IP of the RRAS AWS Windows Server 2008 R2 and the newly configured user that has Dial-In Allowed.
After successful connection, RDP or ping to the private instance works.


Really nice blog post.provided a helpful information.I hope that you will post more
ReplyDeleteupdates like this
AWS Online Course